

Web Server Setup: HTTPD
Your Easy Path to Hosting Websites using CentOS and HTTPD Packages


Welcome to this enlightening episode of our vlog, where we're demystifying web servers! If the thought of setting up a web server sounds daunting, don't worry – we've got your back. In this episode, we're taking you through the straightforward process of creating a web server on a Linux CentOS system using user-friendly HTTPD packages.
Imagine turning your computer into a place where your website lives and is accessible to anyone with an internet connection. That's exactly what we're about to do! Think of a web server as the powerhouse behind websites – it's like your computer's way of sharing web pages with anyone who wants to see them. We're here to show you just how simple it can be. No confusing tech terms, no complex commands – just easy, step-by-step instructions.
Our star player is HTTPD, a clever tool that handles all the communication between your computer and web browsers, making your website accessible to the world. But before we dive into the setup process, let's start with the basics.
Web Server:
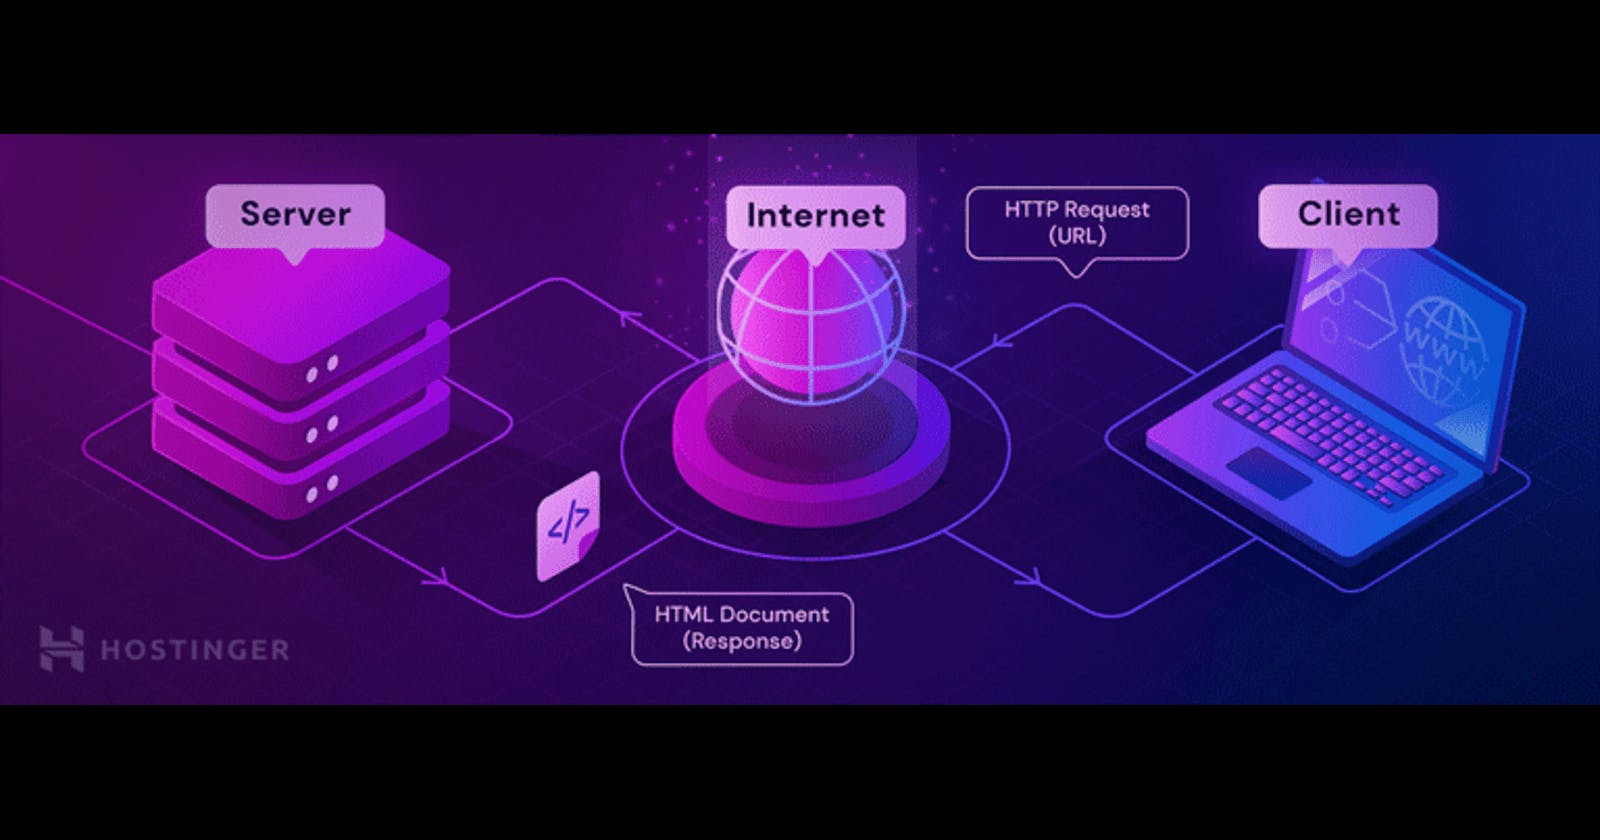
A web server is a computer program that is responsible for delivering web content to clients upon request over the Internet. When a user types a URL in a web browser, the browser sends a request to the web server associated with that URL. The web server then responds by sending the requested web page back to the browser.
There are many different web server software options available, including Apache, Nginx, Microsoft IIS, and others. These web server software options typically run on a specific operating system, such as Linux, Windows, or macOS. Web servers are an essential component of the Internet and are used to host websites, web applications, and other types of online services.
After completing this session, you should be able to configure a basic Web Server using HTTPD/Apache.
HTTPD Server:
Commonly referred to as Apache or Apache httpd, is a free and open-source web server software developed and maintained by the Apache Software Foundation. It is one of the most widely used web server software options, and it runs on multiple platforms including Unix, Linux, Windows, and macOS.
Apache httpd is known for its high performance, reliability, and security. Apache HTTP Server provides a fully configurable and extendable web server. Its functionality can be extended with modules, small pieces of code that plug into the web server's framework and modifies its functionality. It can serve both static and dynamic content, and it supports a wide range of programming languages, such as PHP, Python, Perl, and others, through modules.
Apache httpd is used to host many popular websites, including those of the Apache Software Foundation, Facebook, and Twitter. It is also commonly used in conjunction with other web server software, such as Nginx, to handle different aspects of serving web content. Now that we've laid the foundation, let's dive into the practical steps of getting your web server up and running using HTTPD.
Installing HTTPD/Apache Server:
If you are using Centos 8, then you should have to configure repositories manually or you have to modify the existing repositories in /etc/yum.repos.d/ directory.
To configure Manually: (Optional!)
vim script.sh (create a file name script.sh) and paste the following commands.
#!/usr/bin/env bash
# Maintainer: Pemba T Tamang
# Email: pemba@journeyxyz.com
# Set hostname
read -p "Enter hostname: " host
echo "Setting hostname to $host"
hostnamectl set-hostname "$host"

# Create backup directory for YUM repos and move default files
backup_dir="/etc/yum.repos.d/backup"
echo "Creating backup directory: $backup_dir"
mkdir -p "$backup_dir"
mv /etc/yum.repos.d/C* "$backup_dir"

# Create manual.repo
manual_repo="/etc/yum.repos.d/manual.repo"
echo "Creating $manual_repo"
cat > "$manual_repo" <<EOL
[appstream]
name=appstream
baseurl=file:///media/AppStream
enabled=1
gpgcheck=0

[baseos]
name=baseos
baseurl=file:///media/BaseOS
enabled=1
gpgcheck=0
EOL

# Mount DVD drive
echo "Mounting DVD drive to /media"
sleep 3
mount /dev/sr0 /media
echo "Thank You!"
Save and exit from the file.
chmod a+x script.sh (giving executive permission)
./script.sh (executing script)
Now you can download the packages from the above repo. To Download Packages
yum whatprovides httpd (looking for packages that provide HTTP Server.)

yum module list httpd

common: provides a production-ready deployment (the default).
minimal: provides the smallest set of packages that can run an Apache web server.
devel: provides packages needed to modify httpd
yum -y install httpd (to install HTTP Server packages!)

rpm -qi httpd (verifying packages are installed or not)

systemctl start httpd ( starting httpd daemon )
systemctl enable httpd --now ( to auto start httpd daemon if machine restarted )
systemctl status httpd ( checking the status of httpd daemon )
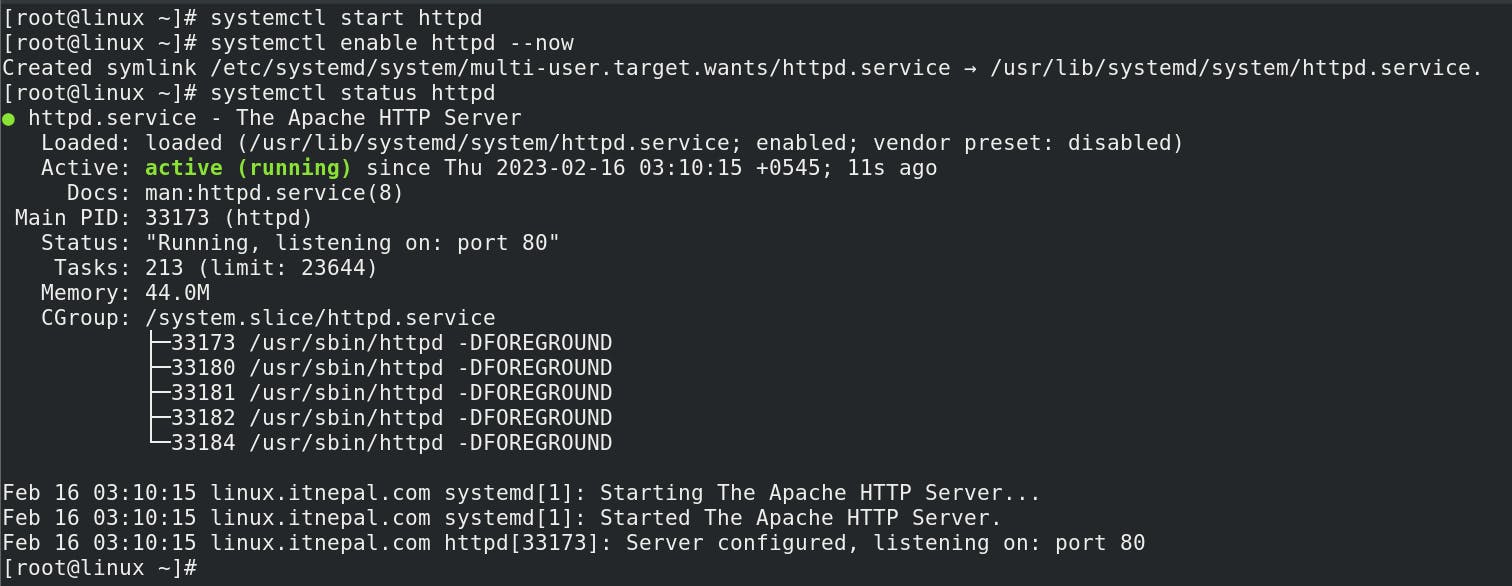
If the status is shown as Active (Running),
curl localhost (default content of web server is showing.)
To enable http and https service from the firewall to access from a browser.
firewall-cmd --permanent --add-service=http --add-service=https --zone=public (adding http and https services.)
firewall-cmd --reload (reloading firewall )
firewall-cmd --list-services --zone=public ( checking the active services from firewall. )

Viewing IP Address
ip a
ip address sh
ipconfig ifname

Here, in number 2: ens160 is my interface name. You can also verify your interface name by nmcli connection show or nmcli device show commands.
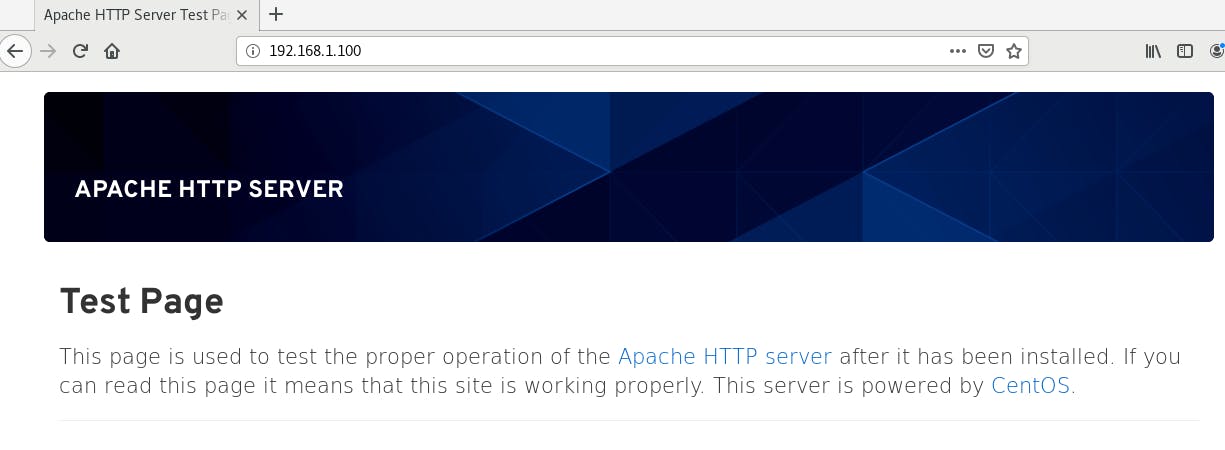
In the browser, http://192.168.1.100 i.e. http://youserver-ip
If you want to open via a domain name instead of IP then, map your ip with a domain name in the /etc/hosts file to test locally!
i.e. 192.168.1.100 linux.itnepal.com (your server IP ---> testing domain name )
cat /etc/hosts

To host your content:
echo "Hi There! " > /var/www/html/index.html
systemctl restart httpd
curl localhost

In the browser, http://your-server-ip or http://linux.itnepal.com

Now, To host your static website!
cd /var/www/html
rm -rvf * ( removing all the files from /var/www/html/ directory )
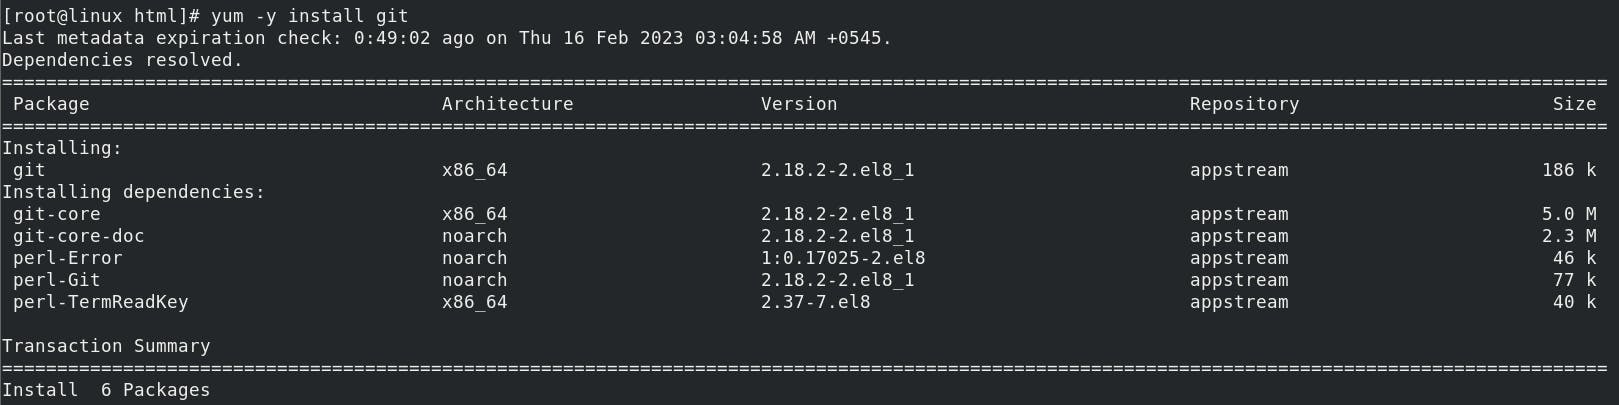
Installing git (To get content from GitHub)
yum -y install git
cd /var/www/html
git clone https://github.com/Pemba-T-Tamang/website.git

mv website/* . ---> moving all the content of website directory to present directory.
rm -rvf website ---> removing website directory(optional)

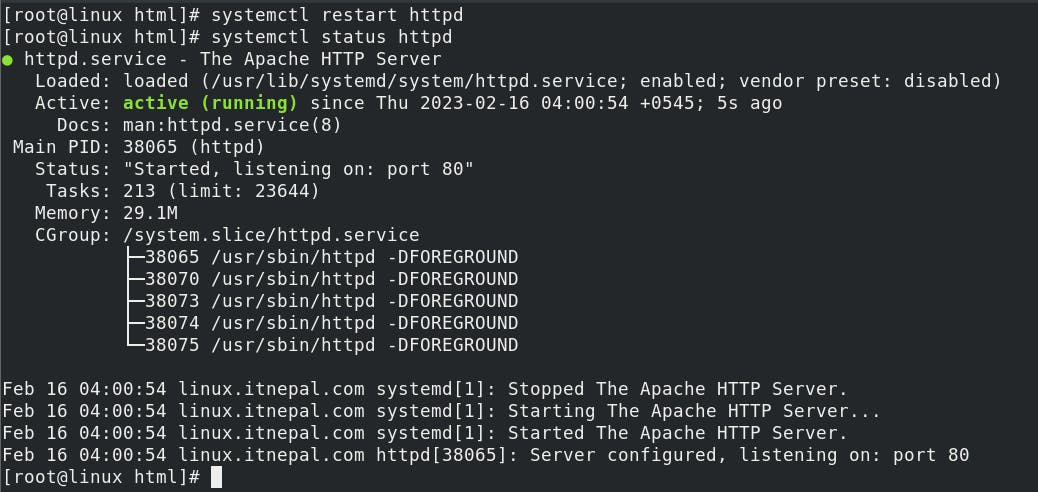
systemctl restart httpd
systemctl status httpd
curl localhost or In browser, http://yourserverip or http://yourdomainname i.e. http://linux.itnepal.com

This is how you can host your website on HTTPD/Apache Server!
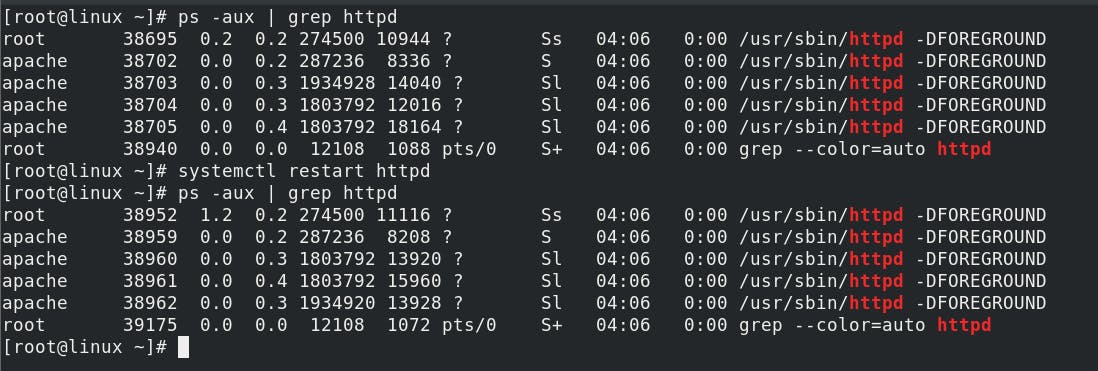
Note:- systemctl restart httpd, is not recommended for high-traffic websites because it kills the running process and generates a new process ID. As a result, the website is down for some time. So, we always recommended systemctl reload httpd instead of systemctl restart httpd. . i.e.
ps -aux | grep httpd ( to viewing the process ID used by httpd )
systemctl restart httpd
ps -aux | grep httpd (Process ID is changed)
ps -aux httpd | grep httpd
systemctl reload httpd (reloading httpd daemon)
ps -aux | grep httpd ( Process ID is not changed )

Configuring HTTPD/Apache server
man httpd or pinfo httpd (documentation is your best friend in the Linux world )
cd /etc/httpd ( main configuration directory of httpd )

In conf directory, there is the main configuration file for HTTP Server. i.e. httpd.conf file. If we understood the parameters define on the httpd.conf file, then we do not need to look much more at another directory. Let's discuss that file.
vim config/httpd.conf ( if you are familiar with the conf file then you can remove all the comments for better visual. If not it's always recommended to read the line. )
Remove all the lines with comments!
After pressing Esc,
g/^\s*#/denterAs a result, the file looks like below…
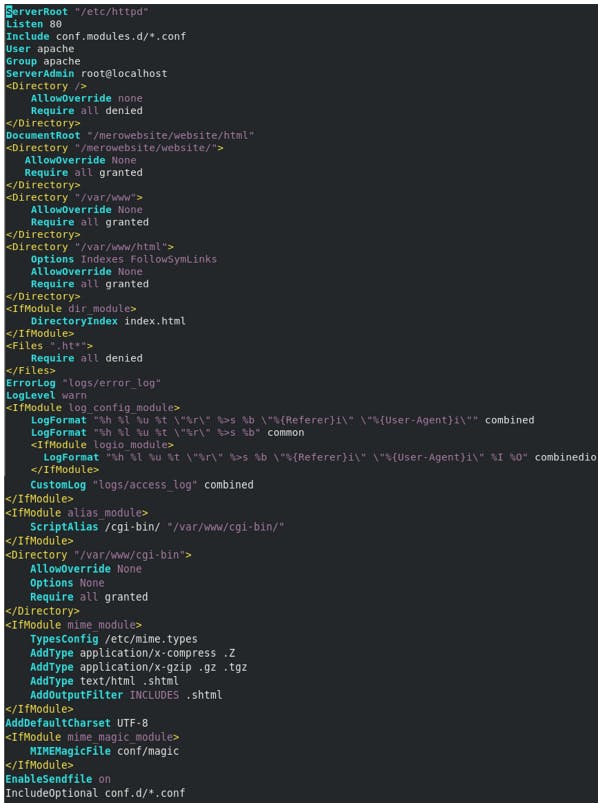
ServerRoot Sets the default directory that httpd uses to store any files referenced in the configuration using a relative path.
Listen to The port that httpd listens on for new TCP connections.
Include these files, in file-name order, at this point in the configuration. This particular setting is meant to be used only to load Apache modules.
User httpd starts as root but then drops privileges to run as this user to improve security.
Group httpd runs as this group.
ServerAdmin email address to help users report issues. system@journeyxyz.com
<Directory> block sets configuration directives that apply to the specified directory and its subdirectories.
AllowOverride None ignores any .htaccess files placed in those directories to override these settings.
Require all denied causes the webserver to refuse to serve content from this directory, and instead returns an HTTP/1.1 403 Forbidden error to clients.
Require all granted grants clients access to content in this directory. Setting this on a directory outside of the normal content tree can have security implications.
Options take a list of options to turn on or off for the directory. For example, the Indexes option serves a web page consisting of a list of the directory's contents if the directory is accessed and no index.html file exists in that directory.
DocumentRoot The base directory for content served by the website. httpd must be able to read this directory and the directory's block must allow it to serve content. true by default.
<IfModule dir_module> If the Apache dir_module module is loaded, then apply these directives.
DirectoryIndex directive specifies that if a URL is requested that points to a directory, and an index.html file exists in that directory, serve that file to the client.
<Files> Works like the Directory block, but applies to individual files.
ErrorLog Errors are logged to this file. The path is relative to the ServerRoot directory. By default, /etc/httpd/logs is a symlink to the /var/log/httpd directory.
CustomLog All accesses to the website are logged here.
Note:- Watch the video for a detailed explanation of the configuration file.
Hosting content from different directories,
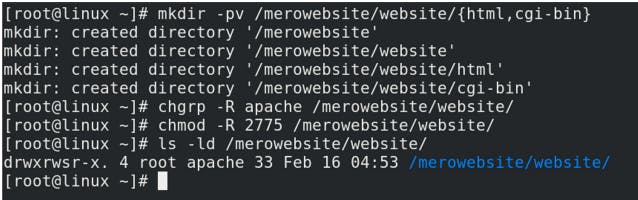
E.g. To host from /mero website/website/ directory,
mkdir -pv /merowebsite/website/{html,cgi-bin} ( creating directory to host contents for website )
chgrp -R apache /merowebsites/website (changing group owner )
chmod -R 2775 /merowebsites/website ( changing permissions )
vim /etc/httpd/conf/httpd.conf ( to modify default configuration file.)
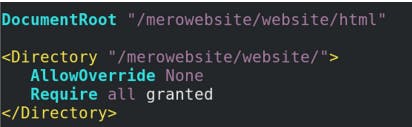
DocumentRoot "/merowebsite/website/html" ( Changing the DocumentRoot location )
# Adding Hosting directory,
<Directory "/merowebsite/website/">
AllowOverride None
Require all granted
</Directory>
If SE Linux is enabled,

ls -lZ /merowebsite/website (viewing the SE Linux context of directory )
semanage fcontext -a -t httpd_sys_content_t /merowebsite'(/.*)?' ( SE Linux trys to protect us. SE Linux blocked to access our directory from web browser. So, We added the httpd_sys_content_t context for to host static content from our directory)
restorecorn -RvF /merowebsite ( Mapping label between SE Linux database and our directory. )
ls -lZ /merowebsite/website (verifying SE Linux context is adding on directory )

mv /var/www/html/* /merowebsite/website/html ( moving everything of /var/www/html/ directory to /merowebsite/website/html/ directory )
systemctl restart httpd
systemctl status httpd

curl localhost or In the browser, http://your-server-ip or http://yourdomainnamei.e. http://linux.itnepal.com
This is how you can host your website with your desired directory!
VIRTUAL HOSTING
Virtual Host:
is a technique used to host multiple domains or websites on a single physical server? Virtual hosts allow a single web server to serve content for multiple websites. It allows the server to differentiate between requests for different domain names and serve the appropriate website content to the client. Virtual hosts are typically used when it is not cost-effective to spin up multiple servers to serve many low-traffic sites. It is common in a shared hosting environment.
Virtual hosts are configured using the web server software's configuration file, such as Apache's httpd.conf file or Nginx's nginx.conf file. Each virtual host is identified by a unique domain name or IP address and has its document root directory where the website content is stored. When a client requests a web page from a specific domain name, the web server checks its virtual host configuration and serves the appropriate content from the corresponding document root directory.
Configuring Apache HTTPD Virtual Hosts
It's always better to write a virtual configuration vile on /etc/httpd/conf.d/ directory with the file ending with .conf. It helps to update the hosts without disturbing the default configuration file. We can declare a block directive to override the settings of the main configuration file for a virtual host. i.e. Each Virtual host needs it's own Virtual Host block.
Lab:
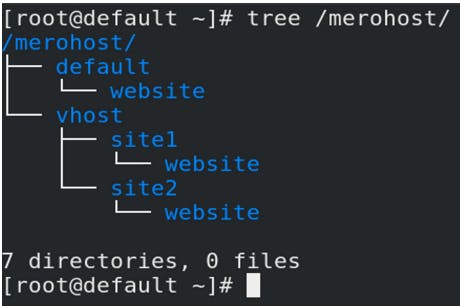
In this demo lab, I'm going to host 3 different websites with different locations. All the websites are hosted with the same IP 192.168.72.177
The default website of the server will be hosted from
/merohost/default/website/directorydefault.itnepal.comOne website will be hosted from
/merohost/vhost/site1/website/directorylinux.nepali.comAnother website will be hosted from
/merohost/vhost/site2/website/directorypemba.ttamng.com
Creating Directory:
mkdir -pv /merohost/default/website
mkdir -pv /merohost/vhost/{site1,site2}/website
tree /merohost
Setting Httpd SE Linux context for the created directory to hosting sites from that directory. ( if SE Linux is enabled )
ls -lZ /merohost
semanage fcontext -a -t httpd_sys_content_t '/merohost(/.*)?'
restorecon -RvF /merohost
ls -lZ /merohost

Not forgot to update the /etc/hosts file.
echo " 192.168.72.177 default.itnepal.com linux.nepali.com pemba.ttamng.com " >> /etc/hosts
cat /etc/hosts

Writing Virtual Host for default site (default.itnepal.com)
cd /etc/httpd/conf.d/
vim 00-default.itnepal.com.conf
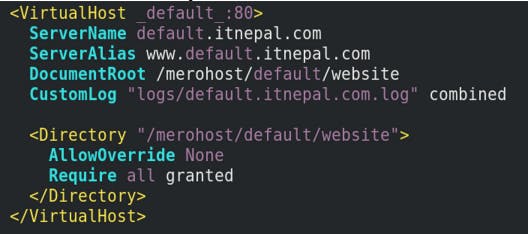
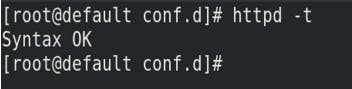
httpd -t ( checking conf file )

Creating index.html file on the default hosting directory to verify the default site is working!
echo " This is default Site for default.itneapl.com " > /merohost/default/website/index.html

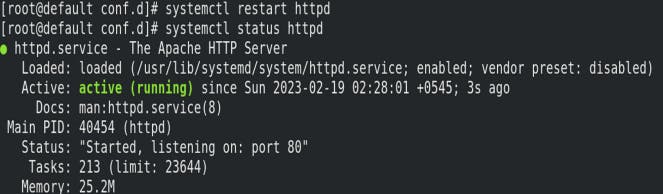
systemctl restart httpd
systemctl status httpd
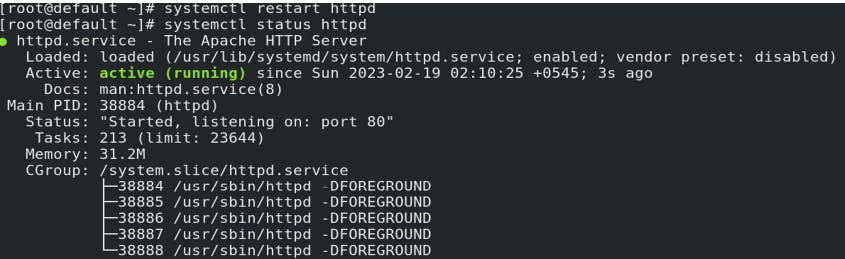
curl http://default.itnepal.com or On browser:http://default.itnepal.com
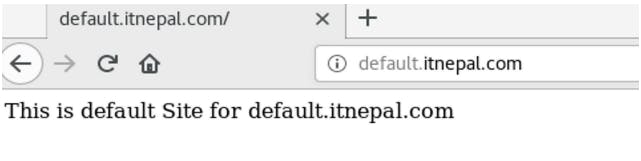
Our default site (default.itnepal.com) is up and running!
Now, creating a virtual Host for linux.nepali.com
vim /etc/httpd/conf.d/01-site1.linux.nepali.com.conf
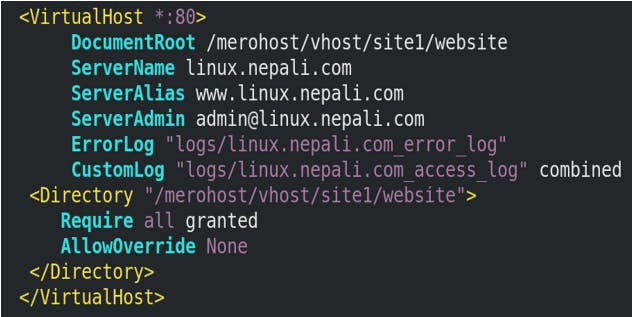
httpd -t
Creating index.html file on the site1 hosting directory for verifying site1 is working!
echo " This is contents for Site1 i.e. linux.nepali.com " > /merohost/vhost/site1/website/index.html
systemctl restart httpd
systemctl status httpd
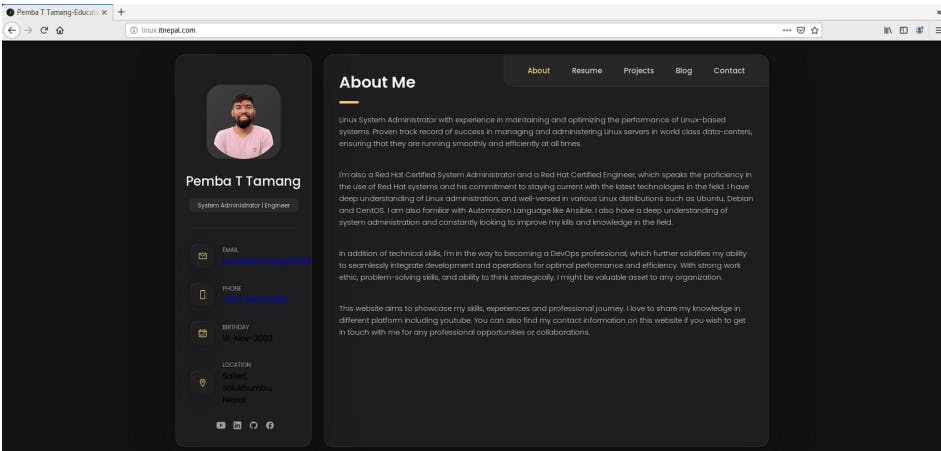
curl http://linux.itnepal.com or On browser : http://linux.itnepal.com

Our site1 (linux.itnepal.com) is up and running!
Now, creating virtual Host for pemba.ttamang.com
vim /etc/httpd/conf.d/01-site2.pemba.ttamang.com.conf

httpd -t

Creating index.html file on the site2 hosting directory for verifying sit2 is working!
echo " This is contents for Site2 i.e. pemba.ttamang.com " > /merohost/vhost/site2/website/index.html
systemctl restart httpd
systemctl status httpd

curl http://pemba.ttamang.com or On browser: http://pemba.ttamang.com

Now our site2 (pemba.ttamang.com) is also up and running!
This is how Virtual Host Works….
Securing Websites:
HTTPS:
Hypertext Transfer Protocol Secure (HTTPS) is a protocol that secures communication and data transfer between a user's web browser and a website. HTTPS is the secure version of HTTP. In HTTPS, the communication protocol is encrypted using Transport Layer Security (TLS) or, formerly, Secure Sockets Layer (SSL). The protocol is therefore also referred to as HTTP over TLS or HTTP over SSL. To use HTTPS, a website must have an SSL/TLS certificate installed on the web server. The certificate verifies the identity of the website and provides the necessary encryption for secure communication between the server and the browser.
By configuring HTTPS for your website, you can ensure that data transmitted between your web server and clients is encrypted and secure. This can help protect sensitive information such as login credentials, credit card details, and other personal information from interception and unauthorized access.
Lab,
In this demo Lab, I am going to configure HTTPS by using TLS Protocol on Virtual Hosts with HTTPD/Apache Server.
Transport Layer Security (TLS): is a protocol used for securing communication over the internet. This protocol is also used by HTTPS to protect web traffic from attacks on its authenticity, confidentiality, and integrity. TLS is also considered the successor of the Secure Sockets Layer(SSL). TLS allows a client to verify the identity of the server and also allows the server to verify the identity of the client. TLS uses public key cryptography to set up a secure TLS session. TLS is based on the concept of certificates. Each server must be installed with a TLS certificate. This certificate contains information about which server the certificate belongs to when it expires and one-half of a key pair; the public key. It is also digitally signed by a certificate authority (CA), and this signature can be used to verify the authenticity of the server's certificate. The server must also be installed with a private key that matches the certificate's public key. Any data encrypted with the private key can only be decrypted with the public key, and vice versa.
When a client connects to a server and requests a TLS session, they perform an initial handshake to agree on a set of encryption ciphers that both can support. i.e. When setting up the encrypted connection, the client and server agree on a set of encryption ciphers supported by both the server and client, and they exchange bits of random data. This random data can be used by the client to generate a session key. To make sure that this key is not compromised, it is sent to the server encrypted with the server's public key which is part of the server certificate.
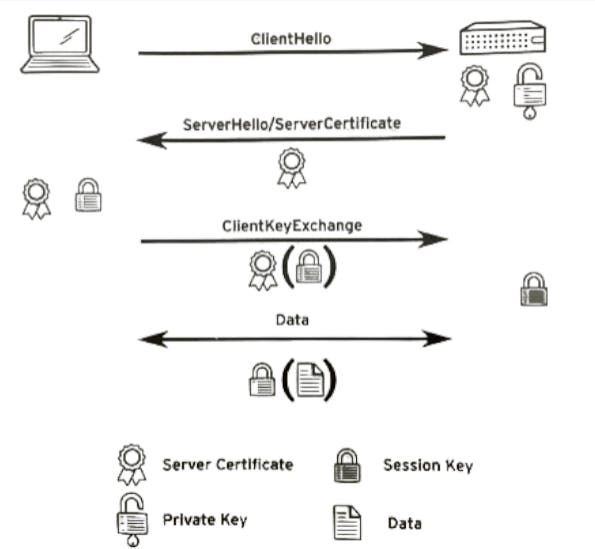
In diagram,
The client initiates a connection to the server with a ClientHello message. As part of this message, the client sends a 32-byte random number including a timestamp and a list of encryption protocols and ciphers supported by the client.
The server responds with a ServerHello message, containing another 32-byte random number with a timestamp, and the encryption protocol and ciphers the client should use. The server also sends the server certificate, which consists of a public key, general server identity information like the FQDN, and a signature from a trusted certificate authority (CA). This certificate can also include the public certificates for all certificate authorities that have signed the certificate, up to a root CA.
The client verifies the server certificate by checking if the supplied identity information matches, and by verifying all signatures, checking if they are made by a CA trusted by the client. If the certificate verifies, the client creates a session key using the random numbers previously exchanged. The client then encrypts this session key using the public key from the server certificate and sends it to the server using a ClientKeyExchange message.
The server decrypts the session key, and the client and server both start encrypting and decrypting all data sent over the connection using the session key.
Obtaining a Certificate
To get a new server certificate, you normally need to create an unsigned certificate signing request (CSR) and matching private key. You then need to provide that CSR to a CA that your users trust, validate to their satisfaction that you control that server, and arrange with them to sign the CSR, converting it into a valid certificate. Many commercial CAs exist that charge money for this service. Web browsers are normally preconfigured to trust signatures from commercial CAs.
But in this lab, we can create our self-signed certificate. This certificate contains identity information and a public key, which is signed by its private key. It can be used to set up an encrypted TLS connection, but clients will not be able to properly validate the certificate and they may reject connections made to sites using them and display other errors and warning messages.
Configuring TLS-Based Virtual Host
HTTP Server needs to have an extension module installed to activate TLS support. On Centos 8, we have to install this module using the mod_sslpackage. This package automatically enables httpd with a default virtual host listening on port 443/TCP. This default virtual host has been configured in /etc/httpd/conf.d/ssl.conf.
OpenSSL is an open-source command line tool that is commonly used to generate private keys, create CSRs, install your SSL/TLS certificate, and identify certificate information.
Click to know more about OpenSSL
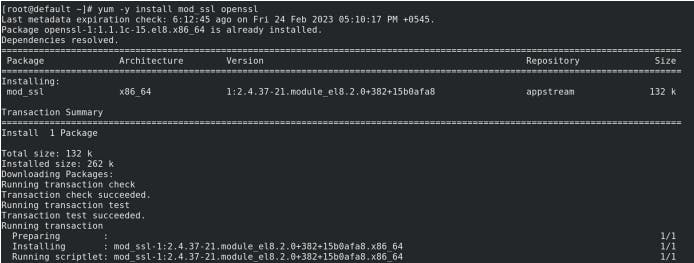
yum -y install mod_ssl openssl (installing mod_ssl and openssl)
webserver private keys are usually kept in /etc/pki/tls/private directory and you should make sure that they are only readable by root and have the SELinux type cert_t for security.
openssl req -x509 -nodes -days 365 -newkey rsa:2048 -keyout /etc/pki/tls/private/selfsignedprivatekey.key -out /etc/pki/tls/certs/selfsigned.crt
openssl: This is the command line tool for creating and managing OpenSSL certificates, keys, and other files.
req -x509: This specifies that we want to use X.509 certificate signing request (CSR) management. X.509 is a public key infrastructure standard that SSL and TLS adhere to for key and certificate management.
-nodes: This tells OpenSSL to skip the option to secure our certificate with a passphrase. We need Apache to be able to read the file, without user intervention when the server starts up. A passphrase would prevent this from happening since we would have to enter it after every restart.
-days 365: This option sets the length of time that the certificate will be considered valid. We set it for one year here. Many modern browsers will reject any certificates that are valid for longer than one year.
-newkey rsa:2048: This specifies that we want to generate a new certificate and a new key at the same time. We did not create the key that is required to sign the certificate in a previous step, so we need to create it along with the certificate. The rsa:2048 portion tells it to make an RSA key that is 2048 bits long.
-keyout: This line tells OpenSSL where to place the generated private key file that we are creating.
-out: This tells OpenSSL where to place the certificate that we are creating.
While providing information, The most important line is the one that requests the Common Name. You need to enter either the hostname you’ll use to access the server or the public IP of the server. This field must match whatever you’ll put into your browser’s address bar to access the site, as a mismatch will cause more security errors.

To verify the Private key and Certificate are in place:
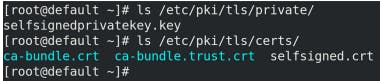
ls /etc/pki/tls/private/
ls /etc/pki/tls/certs/
Now we can configure our virtual host with the TLS. It's simple like usual but we have to add a few more lines.
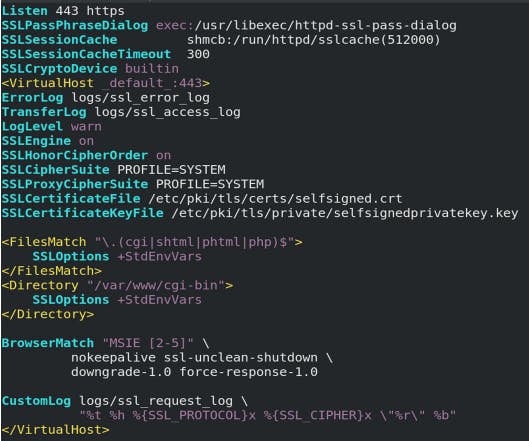
vim /etc/httpd/conf.d/00-default.itnepal.com.conf

SSL Engine On: Enables TLS for this virtual host.
SSLCertificateFile: Specifies where httpd can read the certificate for this virtual host.
SSLCertificateKeyFile: Specifies where httpd can read the private key for this virtual host. In most of the cases, we just need to do the above three configurations. This is fine for the behavior of TLS-enabled virtual hosts. A more detailed configuration like the above contains.
SSLProtocol: Specifies the list of protocols that httpd can use to communicate with clients. You should disable at least SSLv2 and SSLv3, which have known security issues.
SSLCipherSuite: Lists which encryption ciphers httpd can use when communicating with clients. The selection of ciphers can severely impact both performance and security.
SSLHonorCipherOrder on: Ensures that your server will prefer ciphers that appear earlier in the SSLCipherSuite list. Therefore, the most secure ciphers should be listed first.
Note: default parameters are already configured on /etc/httpd/conf.d/ssl.conf file.
cat /etc/httpd/conf.d/ssl.conf
For More information: (Free OpenSSL Cookbook by Ivan Ristic)
You might also need to correct the Certificate and Private key file name on /etc/httpd/conf.d/ssl.conf file.
cat /etc/httpd/conf.d/ssl.conf | grep selfsigned

httpd -t (make sure all the configuration file are right)
systemctl restart httpd
systemctl status httpd

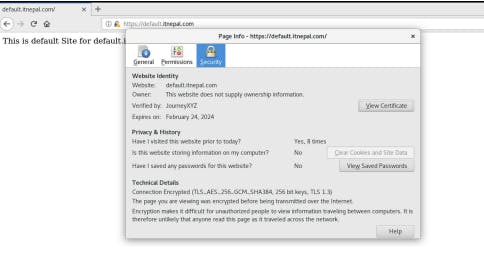
Now, curl -k https://default.itnepal.com on the terminal or navigate to https://default.itnepal.com on the browser.

Click Advanced and Accept Risk and continue. ( this is because this certificate is created by ourselves. )

You can also view detailed information about the site by clicking on the Lock icon on the top left side of the URL section.
Redirecting HTTP Clients to the HTTPS Site.
Redirecting HTTP clients to HTTPS Sites is very important. If we turn off the HTTP, it's improved our security but the users who use HTTP would not be able to connect to your site. So automatically redirecting the client connecting over HTTP to the same resources using HTTPS might be the solution.
To redirect, configure an HTTP virtual host for the same ServerName and ServerAlias as the TLS-protected virtual host. The resulting virtual hosts might look something like this:
vim /etc/httpd/conf.d/00-default.itnepal.com.conf

httpd -t
systemctl restart httpd
systemctl status httpd

Now, curl -k https://default.itnepal.com on terminal or navigate to https://default.itnepal.com on browser.

This is how HTTPS Works!
In this engaging vlog episode, we've embarked on a journey to demystify web servers. Through user-friendly HTTPD packages, we've shown how simple it is to set up a web server on Linux CentOS. From understanding the basics of web servers and HTTPD to exploring the power of Apache and its modules, we've laid a strong foundation.
We've learned the art of installation, configuration, and hosting content using HTTPD/Apache. With practical steps and clear explanations, we've transformed your computer into a stage for your website, accessible to the world. We've even delved into advanced topics like Virtual Hosting, extending the capabilities of your server.
To enhance security, we've ventured into the world of HTTPS, ensuring encrypted communication between users and your website. By generating certificates and configuring TLS-based virtual hosts, we've fortified your server's defenses.
From novices to tech enthusiasts, this episode has equipped you with the knowledge to confidently navigate web server setup. With HTTPD/Apache as your ally, your website is poised to captivate the digital realm.
Thank you for joining us on this enlightening journey!